This past week most of my time was involved either in preparing for the new arrival or getting him ready to appear in his first story. I made a pair of pajama bottoms for Billy and another one for Emil. I'm using a purchased T-shirt to go with each. (The cute bear fabric came from BJ's Quilt Basket.)

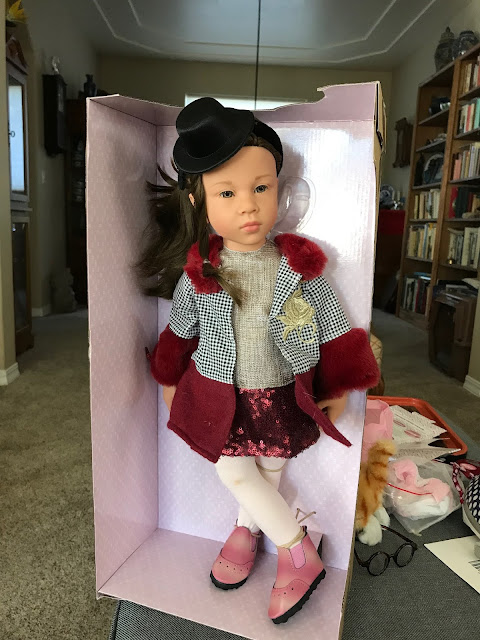
Emil arrived right on schedule, on Wednesday. I was getting a haircut, when I received a text from DH: "Your Emil has landed!" As soon as I got home, I unpacked the box. All of the special extra items I had ordered from My Doll Best Friend in the UK had been carefully packed around the doll, so the package was only big enough to hold the doll box. Here's what Emil(ia) looked like when I opened the box and took all the other items out.
One of the extras was a pair of glasses for Emil. I tried them on as soon as I took down his hair, got him out of the girl's costume and into his PJs. The glasses were perfect! I could already see him as a boy.

Thursday morning was haircut time. First I brushed and washed his hair using a shampoo with conditioner, being very careful not to get water near his eyes. I let him lie for a while with the shampoo doing its work while I got out a towel and prepared the other things I would need.

After rinsing out the shampoo, again being careful not to get the water near Emil's eyes, I began to section out layers of hair in small amounts, using a knitting needle to separate the hair. I did the front first, making sure the bangs wouldn't hang down over his eyes. Then I started on the back at the bottom of the head and working up, then one side the same way, and repeating with the other side. I was careful but not afraid. I knew I could get a very nice wig if something went wrong.
The big problem with cutting rooted doll hair short is that the hair sticks out from the roots. Without the weight that comes with long hair, the short hairs stick almost straight out of the roots. I layered it a bit around the sides and back.
Here's how he looked from the front when I had finished. (The hair had dried by then.)

Here's how it looked in the back.

I wet his hair again, used the glasses to help hold the hair close to his head on the sides and a hair band to hold the rest of the hair down while it dried.

When it was dry, I took off the hair band. I was actually surprised it worked so well, but I thought I could still get the hair a little flatter, so I put Billy's winter cap on Emil's head and left it a few hours. That worked well, but the upper layers of hair were then a little too flat, so I used the doll hairbrush to fluff it up around the top, sides and back, leaving the hair around the edges of the sides and back flat. I snipped a few wayward hairs that weren't the right length.
I was gratified to find that the glasses held the hair down on the sides. It still stuck out a bit in the back, but I had a plan. I changed Emil into his nicer clothes and took some photos. I was happy with the result.


Here's Emil with Billy.

Friday, I wanted to follow through with my plan to hold the hair down in the back. I had thought about an eyeglass band to hold the glasses on, like the band or harness athletes who wear glasses use to keep their glasses from flying off. My first thought was to sew loops on two ends of 1/4" elastic and slip the temple pieces through them, but that didn't work. The glasses just slipped out, because the elastic is covered with a fabric exterior and couldn't grip the plastic.

The added benefit is, now I don't have to take off the nice glasses when I'm moving the dolls around.


Goodbye, summer! We've been continuing our walks. Sunday we had some sprinkles while we walked, but we didn't get wet. I made cocoa when we got home. I hope we can keep it up.
What's on my needles: Still the Sunshine in the Rain. I thought I would be done by now, but it has been a busy week. I may have to rename it "Sunshine in the Snow" by the time it's done. I'm down to the last six rows. I thought I only had to knit the final pattern for two rows, but it's supposed to be five rows, so there you go. With luck, next week you'll see it.

Emil arrived right on schedule, on Wednesday. I was getting a haircut, when I received a text from DH: "Your Emil has landed!" As soon as I got home, I unpacked the box. All of the special extra items I had ordered from My Doll Best Friend in the UK had been carefully packed around the doll, so the package was only big enough to hold the doll box. Here's what Emil(ia) looked like when I opened the box and took all the other items out.

One of the extras was a pair of glasses for Emil. I tried them on as soon as I took down his hair, got him out of the girl's costume and into his PJs. The glasses were perfect! I could already see him as a boy.

Thursday morning was haircut time. First I brushed and washed his hair using a shampoo with conditioner, being very careful not to get water near his eyes. I let him lie for a while with the shampoo doing its work while I got out a towel and prepared the other things I would need.

After rinsing out the shampoo, again being careful not to get the water near Emil's eyes, I began to section out layers of hair in small amounts, using a knitting needle to separate the hair. I did the front first, making sure the bangs wouldn't hang down over his eyes. Then I started on the back at the bottom of the head and working up, then one side the same way, and repeating with the other side. I was careful but not afraid. I knew I could get a very nice wig if something went wrong.
The big problem with cutting rooted doll hair short is that the hair sticks out from the roots. Without the weight that comes with long hair, the short hairs stick almost straight out of the roots. I layered it a bit around the sides and back.
Here's how he looked from the front when I had finished. (The hair had dried by then.)

Here's how it looked in the back.

I wet his hair again, used the glasses to help hold the hair close to his head on the sides and a hair band to hold the rest of the hair down while it dried.

When it was dry, I took off the hair band. I was actually surprised it worked so well, but I thought I could still get the hair a little flatter, so I put Billy's winter cap on Emil's head and left it a few hours. That worked well, but the upper layers of hair were then a little too flat, so I used the doll hairbrush to fluff it up around the top, sides and back, leaving the hair around the edges of the sides and back flat. I snipped a few wayward hairs that weren't the right length.
I was gratified to find that the glasses held the hair down on the sides. It still stuck out a bit in the back, but I had a plan. I changed Emil into his nicer clothes and took some photos. I was happy with the result.

Here's the full body view. (As with Billy, I put a fleece "corset" around his body between his chest and waist to give him a more "manly" look under his clothes.

Here's Emil with Billy.

Friday, I wanted to follow through with my plan to hold the hair down in the back. I had thought about an eyeglass band to hold the glasses on, like the band or harness athletes who wear glasses use to keep their glasses from flying off. My first thought was to sew loops on two ends of 1/4" elastic and slip the temple pieces through them, but that didn't work. The glasses just slipped out, because the elastic is covered with a fabric exterior and couldn't grip the plastic.
A friend who collects and dresses all kinds of dolls suggested using a rubber band using a cow-hitch knot at each end. (To make a cow-hitch knot, you wrap one loop end of the rubber band around the temple piece and put the rest of the rubber band through the loop. To do the second one, you have to make the loop first and then put the temple piece into it, tightening it down.) That worked a treat:

The added benefit is, now I don't have to take off the nice glasses when I'm moving the dolls around.

Emil will appear in this week's story. In last Friday's story, we learn that Emil is very nearsighted and needs hearing aids that are built into his glasses. These are designed for a conductive hearing loss, which is what he has. He can "hear" other dolls' thoughts just fine. (That's how dolls communicate with each other.) He can't hear cars, doorbells, music, dogs barking, etc., without his hearing aids. I wanted a character with a disability, and this seemed the easiest to do. I thought it would be interesting to introduce a disability into the stories.
In other news, we got our first snow of the season on Saturday. Fortunately, we were expecting rain and realized we had a window of "dry" weather long enough to get in our two miles, so we walked the dogs.

Goodbye, summer! We've been continuing our walks. Sunday we had some sprinkles while we walked, but we didn't get wet. I made cocoa when we got home. I hope we can keep it up.
What's on my needles: Still the Sunshine in the Rain. I thought I would be done by now, but it has been a busy week. I may have to rename it "Sunshine in the Snow" by the time it's done. I'm down to the last six rows. I thought I only had to knit the final pattern for two rows, but it's supposed to be five rows, so there you go. With luck, next week you'll see it.
What's on my sewing machine: Still clothes for Emil.
What's in my hoop: Still the Whole Cloth Quilt. No progress this month.
What's in The Doll's Storybook: Emil. Veronika gets a letter from an applicant for the new cast member. Mariah explains why you still have to know how to spell, even if you have Autocorrect, and the dolls choose Emil. (You knew they would!)
What's in The Doll's Storybook: Emil. Veronika gets a letter from an applicant for the new cast member. Mariah explains why you still have to know how to spell, even if you have Autocorrect, and the dolls choose Emil. (You knew they would!)
What's on my iPad/iPhone: Still A Scandal in Battersea by Mercedes Lackey.
What's in my wine glass: Terrain Vineyards California Red Blend 2016, a staple wine for us.
What's my tip of the week: If you're using iron-on transfer sheets that call for using an ink-jet printer, be sure you either a) have an ink-jet printer at home or b) can get the transfer sheets professionally printed within driving distance. There are places that will print iron-on transfer sheets for you using a laser printer, but they have to use a transfer sheet that is designed for laser printers. They may have them at your print shop. Call first. Not all print shops have them, I learned.
Note: This blog post was produced on the iPad and the MacBook, using the iPhone for some photos and some photo processing. No other computer was used in any stage of composition or posting, and no Windows were opened, waited for, cleaned or broken. No animals or dolls were harmed during the production of this blog post.
No comments:
Post a Comment