Showing posts with label American Girl. Show all posts

Monday, November 9, 2020

Moving Ahead

The past week is just a blur. Looking at my photos helped, however. I remember that I made a hat for Pippa to go with the pajamas, though.

I made the hat so I could have a knitted component to the pattern, which made it possible to put the pattern in my Ravelry store.


I had to delete the photos I took that showed how to sew the pajamas, because the file was too big to upload, but I'm hoping the written directions will be sufficient.


There isn't much in the way of patterns for this size doll. The Wellie Wishers, put out by American Girl, are a similar height, but they are slimmer and shorter by a bit. That isn't too bad with something loose and knitted, but the more fitted something is, and the more the fabric lacks stretchiness, the more important fit is.

Now I'm working on outfits for "Mr. Truly Me 74," a boy from American Girl, for Zachary for Christmas.


I'm starting with my Wonderland Turtle using sport-weight yarn. It's designed for the slimmer Götz Happy Kidz, but someone has used the pattern for this size doll, and she included her gauge on her project page, so I'm able to duplicate the gauge and, with luck, the fit.


I will be sewing some things, too. I think I probably have enough patterns to use. It will keep me busy.

The listing for my book on Amazon has the correct price now. It has also appeared on the UK site. It should soon be available for preorder internationally all over the world. You have to search for "Mariah" by Peggy Stuart or "Mariah: Stories from The Doll's Storybook." If you specify "books" you might get it faster, but the link to the page for the US is here.


Everything beyond the costs of production will go to St. Jude. I have a fundraising page set up on their website to become active December 1st., so people will be able to go to that page to donate, if they like, and I think I will be able to include the links for purchasing the book there as well.

I was still making phone calls to get voters to go to the polls all through Tuesday. As you undoubtedly know, we had a long wait to get the results. We were pleased, and by Saturday morning we discovered we had no champagne to chill, so DH had to make a run to Costco. (It isn't as if we knew we might need some bubbly at some point!) We were ready for a chilled toast by the time the speeches were underway.


I was happy to have been part of getting out the vote in Georgia. It was certainly worth the time and effort, and I got to make some new virtual friends. Now they want me to start writing and calling Georgia again in a few days to make sure everyone votes in January for the runoff. Our Christmas plans have been greatly modified, so I should have the time. I've never lived in Georgia, but my parents came from the Deep South, so I feel comfortable with the culture.


What's on my needles: Wonderland Turtle for Mr. Truly Me, just finished the turtleneck collar.

What's on my sewing machine: Waiting for clothes for Mr. Truly Me.

What's in my hoop: Still the Whole Cloth Quilt. No progress this week.

What's in The Doll's Storybook: In The Book, Pippa finds out a little of the history of the story blog and learns that she is part of something bigger than herself.


What's on my iPad/iPhone: I'm still just listening to music. I started a Dean Koontz novel (his new one), but I didn't get very far.

What's in my wine glass: Domaine Auzias Cité De Carcassonne Malbec. I like this one, but my first taste was after sparkling wine, so maybe...

What's my tip of the week: Lining pans and cookie sheets with parchment paper can save a lot of cleanup. Get the unbleached kind if you can.


Note: This blog post was produced on the iPad and the MacBook, using the iPhone for some photos and some photo processing. No other computer was used in any stage of composition or posting, and no Windows were opened, waited for, cleaned or broken. No animals or dolls were harmed during the production of this blog post.

Saturday, May 6, 2017

Doll Sweater Steeking Tutorial

This is the plus-size or manly large-size version of the Fair Isle doll sweater designed to teach colorwork and steeks. The pattern is available on Ravelry as a free download. There are sizes for medium-size dolls here and slim dolls here. (All sizes are based on the 18"-20" size range doll.)

The ribbing is worked flat, which makes it easier to join in the round without getting the sts twisted. It also makes the bottom of the ribbing neater.


Then the chart is followed up to the shoulders, following the instructions for making the armhole steeks. (The center and armhole steeks are recognizable as in interruption of the pattern by vertical lines of alternating dark and light. In some cases, the vertical lines are interrupted because the darker or lighter color was not available for that round of knitting.)

Here is the "back" with one shoulder joined and the center 20 sts on waste yarn, ready to BO for the other shoulder. (Since it can be worn as a cardigan or a pullover, I've designated the side with the center steek as the front and side without it as the back, to simplify the instructions.) The stitch markers indicate where the steek sts start and finish. The steek sts on the left front still need to be BO, along with some of the pattern sts to make the neck opening.


Here's a photo from the front. You can see there are more sts on the front than on the back. That's because the sts held on waste yarn and those BO on the front with form the neck opening.


Here's what it looks like when the steek sts and some of the pattern sts are BO for the neck. The st left on the needle after the BO will go back onto the left needle. Then the front and back shoulder sts can be joined, either by Kitchener stitch (preferred, because there is less bulk), BO and sewn or 3-needle BO.


Here is the front with basting to outline the neck opening to have excess fabric cut away.


Here's a photo of the shoulder after Kitchenering, showing the shoulder stitches and the armhole steek stitches. When you cut, you will cut the horizontal bars between the center steek sts up to the top of the steek, but not into the Kitchenered shoulder and steek sts.


Now we are ready for the sewing machine. (Or other method of anchoring the sts if you prefer.)

First we need to trim the yarn tails from the center steek so we don't catch them in the sewing. You're looking at the body from the side. The center steek is at the top of the photo. You can tidy up the tails first if you want, but the center of the steek is going to be cut away, so it isn't really necessary.


Using the sewing machine, sew down the steek one vertical line of steek sts away from the pattern sts, so you have a slim section of steek sts to use to PU sts for the front button/buttonhole bands.


You can sew one row of machine stitches before cutting and the second row if you want. 

When cutting, I like to put something (in this case a rotary-cutting ruler) between the layers to avoid cutting the floats on the other side. Using sharp scissors and in good light, cut up the center steek on the double vertical lines of dark sts.


Then it's easy to sew the second line of sts one vertical line away from the first one.


I like to cut the armhole steeks before sewing those. The actual sewing is just the same as for the center steek.

For the neck steek, sew a line of machine sts about 1/8" away from the basting stitches, and within the part that will be cut away.


What you have now looks a bit messy. The cut edges curl under and threads are hanging down. 


You can see the machine sewing here. It doesn't have to be too exact because it won't show when your project is done, but you want to keep it within the first two vertical rows of steek sts, so you don't cut through it later when you trim the excess.


You now have a choice between knitting the sleeves first or the neck and button/buttonhole bands. I like to do the bands first, because then I can try the sweater on the doll, check out the fit and make the sleeves the right length, which is harder to do when the neck, button and buttonhole bands aren't finished.

After the steeks are cut, pick up stitches for the button/buttonhole bands, about one stitch for every steek stitch, catching the leg of each stitch that was adjacent to the pattern sts. (Note: Picking up sts at the ribbing is just the same as picking up sts at a finished edge, but when you move into the steek, you want to be sure you keep the yarn on the RS of the work. Don't accidentally start bringing the yarn through from the WS, or you'll run into trouble. You are only picking up a leg of the steek, not going through to the WS. It might help to fold the steek facing over, so you have better access to the stitch leg you're trying to pick up.)


Then count to see how many sts you have, so you can decrease to the right number. In the first row of ribbing, I decreased evenly along the row by K2tog or P2tog, depending on what fit into the ribbing pattern until I had 62 sts. (I like to put locking st markers where I want each decrease to go.)


Here's what it looks like on the inside (nonpublic side).


For this sweater, I put the buttonhole band on the left front and the button band on the right, because it's for a boy. When I had the bands done, I tried it on.


Don't worry if the shoulders stick up like wings at this point.


The sleeves will pull the shoulder seam down, and the excess steek fabric will be trimmed away.

The chart for the sleeves has the same motifs as were used on the body, but in reverse order.

Just as for the body, you can use two circs, dpns or Magic Loop. I prefer the dpns for this part, because the tube is pretty narrow, and moving from one needle to the next seems easier. As for the ribbing, I picked up more stitches than I needed and then reduced them to the 52 sts needed to start the sleeve. I made sure I had 26 sts each on the front and the back of the sleeve. 

You will need to identify the (mostly) dark vertical row of stitches in the armhole steek that is adjacent to the motif/pattern stitches. Here that row is identified with an arrow.


After picking up one of the BO underarm sts, you are going to pick up the left leg of the V in each stitch in this row up the armhole steek.


You'll continue picking up over the shoulder, and when you go down the other side, you'll be picking up the right leg of the V. In other words, you'll be picking up the leg closest to the pattern.

Here's what it looks like picking up for the sleeve.


If you're using two circs, you might want to put a stitch marker to indicate the pattern repeats. If you're using dpns and have a set of five, you can arrange the sts so the break between the needles falls at the pattern repeat. (I only needed to have some way to keep track of the pattern repeat with the 12- and 10-st motifs. They conveniently start and the beginning of the sleeve. How did that happen?)


After picking up all the armhole steek stitch legs and the other BO stitch at the bottom of the armhole, you will work the first row of the sleeve chart. As you do, you will decrease sts evenly until you have the 52 sts, as indicated on the bottom row of the chart, half of the stitches (26) on each side of the armhole. The beginning/end of round is in the middle of the underarm.

After the first sleeve is worked to the point you think you might be getting close, it's good to try the sweater on the doll. You want to stop the pattern when the sleeve is 1/2" shorter than the length you want the sleeve to be. Here the girls are kibitzing about how much longer the sleeve should be to fit Carter. 


Carter is stocky and has shorter arms and legs, but his shoulders are bigger, so that takes up some of the sleeve length. I found that stopping after the Row 30, the final decrease row, the sleeve would be about how I like it with the ribbing. (You can always make the ribbing a little longer if you need to.)


Here's the sweater with one sleeve done. (Thank you, Carter.)


You won't need to try on for length of the second sleeve, because you can just stop wherever you stopped for the first sleeve. For American Girl dolls, I'm guessing you would continue the pattern through Row 35. The sleeve chart continues through Row 42, in case your doll has longer arms. If that isn't long enough, you can refer to the Body Chart, working backwards, starting with Row 23.

The sleeves are the same width for all 18"-range dolls except for length. The differences (other than sleeve and body length) for the slimmer dolls like Götz only affect the body and neck.

I like to tie the buttons on doll clothes. I use a skinny crochet hook to pull a piece of yarn through one hole and down through the other. Then I either use the crochet hook or a yarn needle to pull each end of yarn though the button band, at least two sts apart, tie a tight knot and then snip off the tails.

Time to finish the inside. This is how it looks at this point:


I tidy up any loose knots along the sleeves (or you can untie them and weave them in if you *really* want to). If you want to save time but worry that the knots might come undone, you can run a row of machine stitching down the tails, as close as you can get to the knitting without catching it in the sts, so only the tails are sewn. It's OK if you go over the knots.


Then trim off the tails without cutting the knots (or the machine stitching, if that's what you did).


It should look something like this:


The final step is to finish off the raw edges on the inside of the sweater. You can stitch them down, being careful not to sew through to the outside, using a blanket stitch, an overcast st or cross-stitching, or you can cover the raw edges with thin decorative ribbon or stretch lace.


If you want, you can line the sleeves with nylon net or other thin, non-raveling fabric.

A word about floats and doll hands: It's really difficult to get dolls to make a fist. I know, I've tried. They seem to splay their fingers, and no matter how careful you are, the fingers sometimes get caught in the floats. But do they tell you there's a problem? There are several ways to deal with this. 

1) You can put a doll sock or a plastic sandwich bag on the doll's hand before inserting into the sleeve, pulling it off after the hand is out.
2) You can line the sleeve with nylon net or other thin fabric (better than choice #1 if the sweater is for a child's doll)
3) You can limit the stranded pattern to the upper part of the sleeve and finish the sleeve all with one color, eliminating floats.

But wait! There's one more step! Get out the runway for the models to show off your steeking handiwork. (I made this sweater for Zachary Jr.--The Doll Formerly Known as Buddy--but he lives in Wisconsin, so Carter is happy to model for me. Here it is as a cardigan.


Dolly wanted to try it on, too. The next one will be for Daphne Jr., who is just Dolly's size.


She tells me this should fit an American Girl Doll, too, but she isn't sure about the sleeve length.

When you get to this point, you deserve your Steeking Badge.


Addendum: In case you decide to line the sleeves with nylon net (or other thin fabric), a good idea if you're giving the sweater to a child's doll.

Cut a piece of nylon net the size of the sleeve. I made a template by putting the sleeve down on a piece of paper and drawing a line a little bigger than the sleeve on each side. Then I connected the two lines. The line along the top of the sleeve is the fold line. Cutting nylon net can be difficult, so find a background that shows up your color net and pin the two layers together. Cut to size.


Turn the sleeve inside-out. Pin the nylon net to the inside of the sleeve. It's OK if the net overlaps the cuff. It doesn't need to reach all the way up to the shoulder, just close.


Sew the nylon net to the sleeve at the seam, starting at the top of the cuff (where the ribbing *stops*). Be careful not to catch the outside of the knitting, even if you use thread that matches well. You only need to catch the inside layer of the yarn to keep the lining in place. You can catch both edges of the lining at the same time. When you get to the top, continue sewing the lining to the top of the sleeve, still being careful not to have the thread go all the way through to the outside.


Trim the part of the lining that overlaps the cuff (if any) to be even with the bottom of the sleeve colorwork, being careful not to cut any of the floats.


Repeat for second sleeve.

Dolls shown are these. Carter--My Sibling, My Pal. Dolly--Madame Alexander. Also shown are the Tonner My Imagination Starter Redhead and Goetz (Gotz) Classic Kidz Vroni. Yarn used is Knit Picks Palette.

Monday, March 13, 2017

Raising the Steeks

This is Carter.

After an internship as a model for our grandsons' doll clothes, he will be completely outfitted with his own clothes and go on to his paying job (paying, in that he will be bringing in money) at Habitat for Humanity as part of their silent auction in October. After that, he will go to a new home, most likely with a child who will cherish him and his wardrobe. 

Carter came to us from My Sibling and My Pal Dolls and came with his own denim carry tote (so he can go everywhere), a lttle plastic-free shopping bag for his groceries and a booklet on how to protect the environment. It's a good thing he arrived on a warm day. Carter definitely needs some winter clothes at our place. I'll be making him some sweaters, and changing him into some warmer pants.

He told me he was named after the former president, who has been such a supporter of Habitat for Humanity.

One of the first things I did was to try Gabi's sweater on him to help me in designing a sweater for him and other dolls his size. I found it tighter than I liked for this kind of sweater.


It fit him about the same as it did Molly, who came to Vintage Stitchers with Janet, just for the purpose of trying the sweater on for size.


Molly is an American Girl doll. She has smaller shoulders than Carter, but her arms are longer. The chest measurements are about the same. Looks like I'll be writing the pattern for another steeked doll sweater very soon.

In the meantime, Vroni's sweater is coming along. I'm on the second sleeve now, but here it was with the first sleeve underway.


My test knitter, Penny, encouraged me to draw up a full chart for the body and the sleeve. I'm very grateful to her, because it turned out to be easier than I thought, and I can see it will make it easier for people who want to follow my pattern. I'm also grateful to Simon, who inspired me to make Fair Isle sweaters for dolls (by making some himself) and then sent Vroni to live with me.
I've learned a lot about making these sweaters and am hoping to have very clear directions when I get done with this one.

In other doll news, Dolly got her ears pierced.


Actually, they are stick-on rhinestones, and they can be removed easily.


I found them at Michael's. I'm going to check with DD first to see if she thinks having a doll with pierced ears might make Daphne want to get her ears pierced. If I get the OK, a package of these will be in the birthday present in May.

The snow is melting and after the crazy blizzard a week ago that resulted in my getting home at 11:20 PM from a rehearsal that got out at 9:10 PM, we haven't had any more snow. I was happy to get to Vintage Stitchers, first time in a month. I had picked up my Kaleidoscope quilt from being quilted. I took it to Vintage Stitchers to show off the custom quilting done by Cindy, who works out of Davidene's Quilt Shop. I hope to get the binding on it this week.


Barbara had finished this great quilt.


The backing fabric she found for it is perfect. That's it, hanging on the chair.

Marilyn had this great machine appliqué quilt.


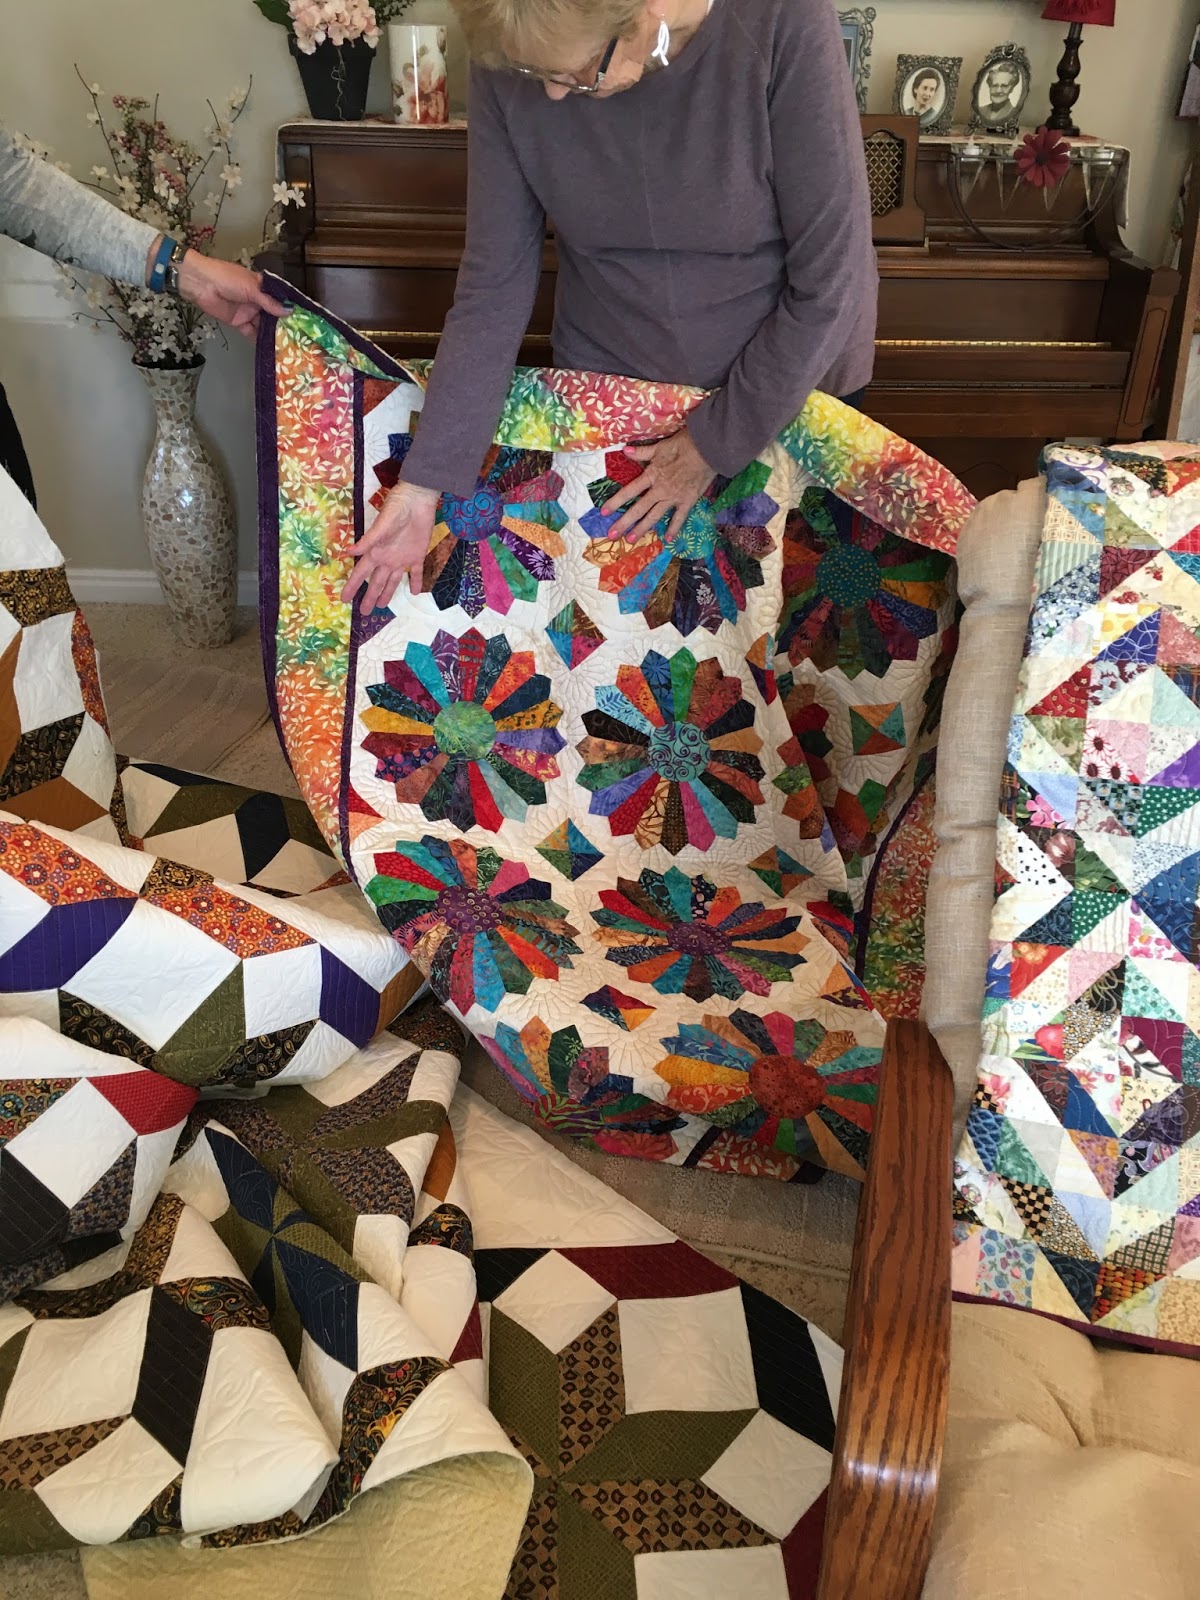
Barbara showed off her Dresden Plate quilt, because Janet was working on one.


Janet put down the samples of background fabric under her finished Dresden Plates, to get our advice about which one was most suitable. We all voted for the one on the left, which has a printed pattern that resembles a loose-weave fabric.


The quilt is for her daughter, who is getting married. Several of us went through our batiks and donated the colors she wanted, so she could have a variety.

Janet has been making pussy hats for friends.


With bulky yarn they go fast, and everyone wants them. She can make one in an evening, about as fast as making a dishcloth. Janet is so generous with her time.

Here's some added cuteness and a taste of spring, for my readers who live in parts of the country where spring comes when it's supposed to: our two younger grandsons planting strawberries at a local nursery.


Speaking of "spring," the pups are happy to get out in the backyard again, which they have been able to do the last few days, first with supervision: someone to keep them away from the house, where large blocks of ice were coming off the roof, a serious danger. We then graduated to letting them out alone for short periods when we couldn't see any snow hanging off the edges of the roof. Now the roof is clear...until the next blizzard.


What's on my needles: The second sleeve on the “Vroni’s Lavender Fields” sweater.

What's on my Featherweight:
 Steeks for “Vroni’s Lavender Fields” sweater are finished. Waiting for the next one.

What's on my loom: I still haven’t started anything with the leftover warp.

What's on my wheel: Stanzi still looking at me reproachfully.

What's on my iPad/iPhone: Finished listening to D. E. Stevenson’s Vittoria Cottage. Now listening to Lies, Damned Lies, and History by Jodi Taylor. On the Kindle app, I’m still reading Dying to Read, The Cate Kinkaid Files Book #1.

What's in my wine glass: Fish Eye Shiraz. Always nice value.

What's my tip of the week: Like creamed soups but don’t want to fill up on cream? Want to add protein to a boxed soup? Use a carton of silken tofu to make your soup creamy without the fat or to increase the protein for a quick meal. Blend in the blender or use an immersion blender or egg beater to mix the tofu with some liquid. The soft tofu is the easiest to blend, but you can use even the extra firm with the same results. You might need to adjust the seasonings, because the tofu doesn’t add any.


Note: This blog post was produced on the iPad and the MacBook, using the iPhone for some photos and some photo processing. No other computer was used in any stage of composition or posting, and no Windows were opened, waited for, cleaned or broken. No animals were harmed during the production of this blog post.